
Turn any photo into a dot grid artwork with these Photoshop actions. You'll get great results with dots that change size. They get larger in brighter areas and smaller in darker areas. Free download available.
In this tutorial, we are going to learn how to create a realistic Silent Hill inspired artwork. This tutorial covers techniques such as creating fog using only a few fill layers and the Cloud render tool, easy ways on how to blend images together to make them look like they are in a foggy scene, painting-in real looking ash through a few brush strokes and giving the image a soft contrast using the Blur tool and a few blending modes.
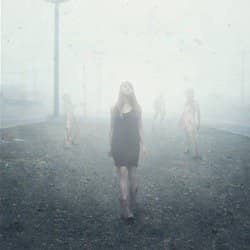
Preview of Final Results

Silent Hill Inspired Photo-Manipulation Photoshop Tutorial
Resources
- Silent Hill BG - hielorei
- Blood Brushes - KeRen-R
- Winter SnowFlake Brushes PS7 - KeepWaiting
- ballade iii - medusestock
- Silent Hill Nurses 1 - Stickfishies Stock
- Creature 01-01 - stiks 1969
Step 1: Create a Photoshop Image File
Let’s begin by creating a new image file, go to the Menu bar and click File > New, and then input the following values on their respective fields:
- Presets: International Paper
- Size: A4
- Width: 2480 pixels
- Height: 3508 pixels
- Resolution: 300 pixels/inch
- Color Mode: RGB Color; 8 bit
- Background Contents: White

Step 2: Create the Background
In this step, we will be creating the background. To start, let’s open Silent Hill BG by hielorei. Once open, activate the Move tool by pressing V on your keyboard. Now, drag that image into our canvas. It should appear like this:

Next, activate the Transform tool (Ctrl/Cmd + T) and resize the image as shown below:

The result should be like this:

Next, let’s fix the angle of our background. To do that, activate the Transform tool (Ctrl/Cmd + T) and then once the grid appears, right click on the image and a contextual menu would appear. Click on Distort. See image below:

To distort the image, see the instructions shown on the image below:

The result should be similar to this:

Next, let’s clean up this background - let’s remove that unwanted bulky thing on the road. To do that, activate the Clone Stamp tool (S). Once active, input the following:
- Brush size: 300px
- Hardness: 0%
- Opacity: 100%
- Flow: 100%

Now, let’s get to it!


The result:

Let’s clean it up some more - activate the Clone Stamp tool again and set the following:
- Brush size: 100px
- Hardness: 0%
- Opacity: 100%
- Flow: 100%
Now, remove the unwanted parts shown below:

The result:

Now, let’s adjust the darkness of the foreground. To start, let’s create a new layer (Ctrl/Cmd + Shift + N) and when the New Layer box opens, input “Darken” on the name field.

Next, activate the Brush tool by pressing B on the keyboard. Once open, make sure that the brushes are the default Photoshop brushes. See image below:

To make sure that you’re using that, simply right click the canvas while a layer is selected and while the Brush tool (B) is activated and then click on the button highlighted below: