

Make skin look perfect in one-click with these AI-powered Photoshop actions.
This tutorial will lead you through the steps of creating a children’s book illustration that can be edited and changed when the author you are working with wants minor changes made to the art. And when using this kind of layout, the changes will be easy and generally painless for you, as the artist. Part I covered the background, and Part II covers the foreground.
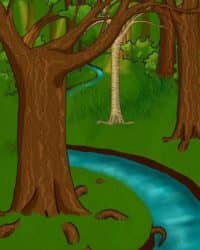
Preview of Final Results

Children’s Book Illustration Photoshop Tutorial
- Program: Photoshop 7
- Difficulty: Beginner-Intermediate
- Estimated Completion Time: 30 minutes
Note: This tutorial was meant to be completed using a pen tablet. If you are using a mouse, the brush sizes will be irrelevant. However, a good estimate for brush sizes when using a mouse is about 1/3 the size of the brush I am using.
Step 1
First, open the first part of the tutorial that was completed in part one. The background provides the basis for the rest of this picture, and so it is extremely important that this part is completed first.

Step 2
Make a new layer and title it “foreground trees”.

Step 3
This layer will consist of the trees in this layer. We will begin by blocking them out like in the background, but they will end up much more detailed.
To begin, block in a few trees with color # 693B0E and a size 100 pixel brush set to full opacity.

Step 4
Make a new layer and title it “beech”. This layer should go beneath the “foreground trees” layer.

Step 5
Now, we are going to create a beech tree. To do so, we will use the same beginning, and block it in using color # BC9E5D.

Step 6
Now it is time to block in the basic shadows This can be done using the same bush as before and color #4D2600.

Step 7
Using color #837351, block in the shadows on the beech tree on the “beech” layer.

Step 8
Use the magic wand tool to select the light yellow area on the beech tree. Line both sides of the selected area with color #AO8750.

Step 9
Now highlight the center ob the beech tree with color #D0B57B.

Step 10
Select the area around the tree with the magic wand tool, and then select the inverse (rt click à select inverse). The tree should be selected.

Step 11
Apply a Gaussian blur (filter à blur à Gaussian blur) filter to the tree, with the radius set to 5.4 pixels. This will bend all of the colors nicely together, and give the impression of a smooth surface.