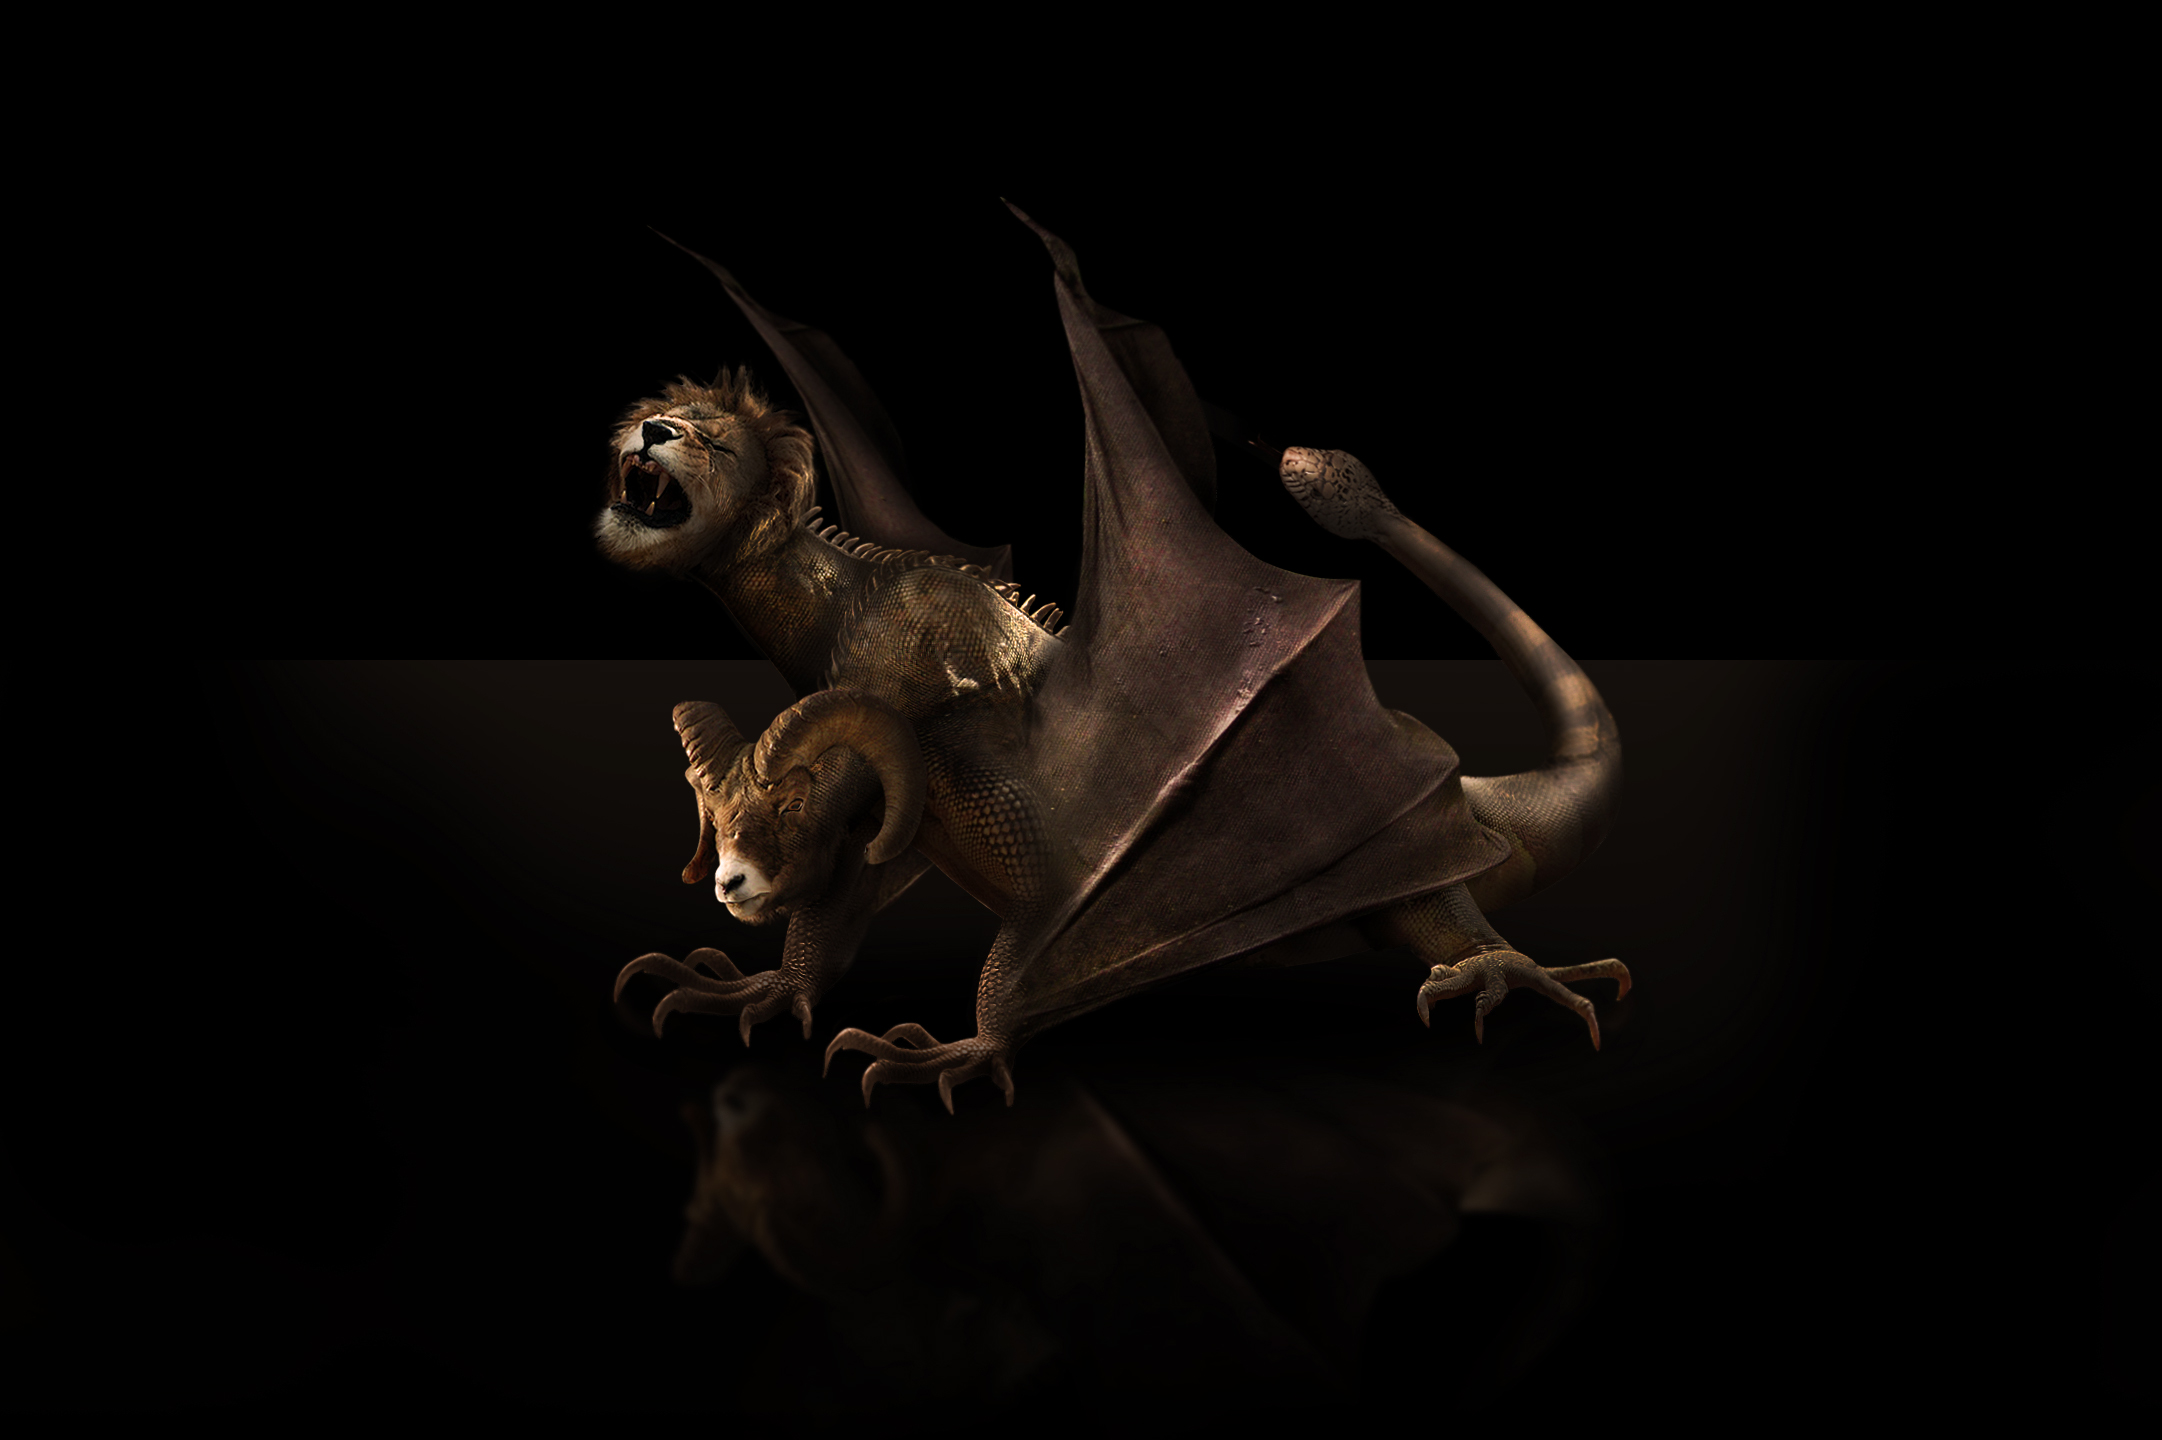
Photoshop allows us to create the impossible, like this mystic and nonexistent creature called "Chimera." You'll learn some techniques of photo manipulation, how to apply shadows and lights, several ways of extracting pictures from its backgrounds and more.
Before We Get Started
One of the beauties of photo manipulation is you can create something which everybody knows can't possible and make it look almost real. This time I'm taking this sentence to the extreme, the most fantastic creature of ancient mythology is the "Chimera."
There are many descriptions from many authors of how it is supposed to look like, I chose the most spectacular, a creature with a dragon's body with two heads, one of a lioness and a second of a goat, with dragon wings and a snake head on its tail. Well that's easy to write down, but let's see how hard is to create it. First, after several hours of searching, these are the images I'm using in this tutorial:
- Lizard
- Big Horn Sheep (Goat's head)
- Lion thanks to Martin Pettitt
- Bat thanks to Aidan Jones
- Snake Head thanks to lostinfog
This isn't a basic tutorial so I'll skip the elemental instructions on how to add a Layer Mask and in order to save space I'll skip to screenshot some variations between Brush Tips, Opacities and Flows.
Step 1 - Setting up the Document
As with every great graphic piece, this one starts with a blank canvas, in this case filled with black. 1500 px by 1000 px at 72dpi (you can do it larger if you want to).


Step 2 - Extracting the Body
Open the lizard image as is and double-click on the "Background" layer to make it editable. Then (and this isn't a quick step) use the Pen Tool to draw a shape around the lizard body, then go to Layer > Vector Mask > Current Path to apply it. Then Drag and Drop the layer itself into your work document.
I know that we all have things to do and spend one hour extracting a lizard from its background isn't funny, that's why I'm adding all the extracted shapes of each picture in the plus files, so if you're not subscribed yet this is a good excuse to do it.
Back to the tutorial, rasterize (Control-click on the layer and select Rasterize from the options) the lizard layer and name it "Lizard."


Step 3 - Neck 1
Now we will draw our creature's neck. Create a new layer and use the Polygonal Lasso Tool to draw a shape like the one in the image below. Without deselecting switch to the Clone Tool, set a big, soft brush tip, select the cloning source somewhere over the lizard's body, and start painting inside the selection. Once you've finished name the layer "neck 1."


Step 4 - Join the Neck with the Body
Joining something in any photo manipulation design is pretty easy. Add a Layer Mask > Reveal All... to the "neck 1" layer, on the layer mask, using a soft black Brush (Hardness 0%) hide some areas near the body. Use the same technique (create a Layer Mask and paint into) to hide the Lizard's head. The trick to make it look real is hide strategic areas of the new neck, and leave others visible, leaving visible the body's wrinkles is a good idea.


Step 5 - Duplicating the Neck
Our lovely creature has two necks, so we need to duplicate the "neck 1" layer and name the copy "neck 2." Using the Free Transform Controls distort it a little bit. Then hide some areas of the neck (painting on the layer mask) to make it look nice.


Step 6 - Dodge and Burn
One of the more basic rules of photo manipulation: "Dodge for shadows and Burn for lights," those tools will help you create believable light effects on any surface, I'm basing the lights/shadows positions trying to make them match with the lizard's lights. Later in this tutorial I'll only name those tools, but every time you can use them just like shown on the following screenshots. Now merge those three layers ("Lizard," "neck 1," and "neck 2") into a new layer named just "Body."


Step 7 - Neck Fibers
Our lizard has something like a crest on its back, we need to expand it over its two necks. Select a portion of the crest, copy and paste two instances over both necks. Using the Warp Tools (Edit > Transform > Warp) distort the crests to make them match the neck's curvature. Finally merge everything again into a layer named "Body."


Step 8 - Making it Stronger
Since our lizard was a little weak, we will need to inflate a little bit its muscles in order to make it look stronger and threatening. Select the "Body" layer and go to Filter > Liquify, on the tools panel select the Bloat Tool, using a big brush inflate some areas like the shoulders and tail, then using the Forward Warp Tool push its abdomen a little bit up to make it look more svelte (face it, lizards are both lazy and fat).


Step 9 - Fixing its Claws
Even the picture of the lizard looks good overall, there are always some areas that you neither the public will like. This is the case of the front-left leg (from the lizard's perspective), it just doesn't look good. In order to fix it, Select, Copy and Paste a portion of the front-right leg and paste it above the "Body Layer" naming it "Claw."
Add a Layer Mask > Reveal All...to both layers and use a soft Brush to paint over their respective layer masks to hide the old leg and merge the new leg in a nice and smooth join. Finally as a final touch, use the Liquify filter and its Forward Warp Tool to distort the fingers a little bit to make them look slightly different than the other leg. Once you've finished, merge both layers again into a brand new "Body" layer.


Step 10 - Goat's Head
The first head we will add is the Goat's head. A good picture with the correct perspective is crucial in this kind of work. I had the luck of finding this mountain goat picture and it became perfect for this work. Using the pen tool and a Vector Layer Mask, just like on the Step 2, extract the head and Drag and Drop it in our main document.
Then, Add a Layer Mask to the new "Goat" layer and using several sizes of brushes hide any extra fur that may appear. Using a small, soft Brush and switch between white/black could create a nice fur effect (if you have a Graphic Tablet it's time to use it).
Finally adjust Hue/Saturation and Levels, just as shown in the bottom of the image below, to make the head match the overall color.


Step 11 - Fixing Overall Color (Optional)
Sometimes because of the original picture, some areas have colors which simply don't look good. This is the case of the front legs, that's why, with the help of a Feathered Selection I'm adjusting the Hue/Saturation window (checking the Colorize option) of the selected area.


Step 12 - Shadows
This is maybe one of the hardest parts of the entire process, adding pseudo-realistic shadows using a brush is a lot of hard work that requires all your creative knowledge. I always add two Shadow's Layers for each Image Layer, one on top and one below. Look at the following images, for the "Goat" layer there's a layer above named "Goat Shadows Top" and below another one named "Goat Shadow." On the first one you'll paint some shadow,s which work something like the Burn Tool, and on the second one you'll add drop shadows to give the image a certain deep level.
On each layer you should paint the amount of shadow that you may consider necessary, using several Brush sizes, Opacities and Flows percentages, and you can combine them with the eraser tool if you need it.
Advice: Do not use Black (#000000) because few things in the real world are 100% black, instead use some dark color (I'm using this #11110D). Change each shadow layer Blending Mode to Multiply to preserve some texture.
Below there are a bunch of screenshots depicting the shadowing process. Finally I'm moving the goat's head a little bit and using the Liquify filter. I distorted its eye a little bit to make it look angry. Then you can group the Layers into folders accordingly.


Step 13 - Lions Head (Extracting)
Adding the Lion's head will need a bit of work. First open the Lion image and show its channels, duplicate the Blue Channel and adjust its levels as shown in the image below. Since a large area of the lion's face is still with a lot of white on it, use the Brush Tool to fill those white areas (always working on the Blue copy Channel). Finally Select All and Copy the selection, then delete the Blue copy Channel and make visible all the RGB channels once again.


Step 14 - Still Extracting Lion's Head...
Add a Layer Mask to the lion image, and Alt-Click on it to show the actual grayscale mask. Paste the clipboard there and hit Command + I to invert its colors, click over the Layer miniature again and you'll see most of the hair is already extracted from its background. Then use the Lasso Tool to draw a selection around the lions head, invert it and fill it with black. Then you'll have an easier to work with lion's head. Drag and drop it on our main document. Name the new layer "Lion."


Step 15 - Refining the Lion's head
Using several sizes of Brushes paint over the layer mask to refine the furry borders of the head. Once you have it done, Flip Horizontally the head and adjust the Hue/Saturation values as shown at the bottom of the image below. This will make the head match with the overall color.


Step 16 - Refining the Fur
Put as much time as needed to make the fur look nice, we don't need too much of it. Use several sizes of small brushes and switch between black and white colors to polish the fury borders. Besides, leaving some lizard skin texture on some tiny areas over the lion's face is a good idea to make it look like a hybrid creature.


Step 17 - Dodge and Burn and Shadows
Yes, I know this takes a lot more than just adding the Goat's head, but it was worth it. It looks great at this point. We just need to polish some lighting issues by Dodging and Burning some areas. Then use the same technique described ins Step 12 to add some shadows above and below the lion's head. Now put everything in a folder named "Lion."


Step 18 - Dragon's Wings
Let's add the wings. Open the bat picture and extract the wing from it, Drag it into our main document and onto a layer named "Wing," above every other layer. There, Warp it and place it near the front-left leg. Adjust the values of the Hue/Saturation and Levels to make them match with the general color scheme.


Step 19 - Merge the Wing with the Body
Add a Layer Mask > Reveal All to the "Wing" layer and hide some areas near the leg creating the illusion that the wing belongs on it. Dodging and Burning the "Shadows" Layer will give the final touches. Put everything in a folder named "Wing."


Step 20 - Another Wing
Duplicate the "Wing" Layer and place it below the "Body" folder. Free transform it to make it really narrow, placing it near the front-right leg. Warp it a little bit to make it look different than the original.


Step 21 - Merging the Second Wing
Paint over the "Body" Layer's Layer Mask to hide a little bit of leg to make the wing visible. Then add a Shadows' Layer and paint some shadows over the needed areas.


Step 22 - Wing Texture
Our wing looks too smooth, we will need to add some texture to it. Select a square portion of the "Body" layer, copy and paste it into another document.
Using the Filter > Other > Offset, change its border's offset to nearly the middle. Then use the Clone Tool to soften the hard border lines. Next open the Hue/Saturation window and turn down the texture's Saturation value to -100. Then go to Edit > Define Pattern... and save the pattern with a creative name like "Pattern 1."
Back to our main document, select the "Wing" Layer, and add a Pattern Overlay layer style. Select the recently created pattern and change its Blend Mode to Overlay and its Opacity to 75%. Do the same with the second layer.


Step 23 - Add a Photo Filter
Just to help us out with the details, let's add a Photo Filter Adjustment Layer to the image. Use the values shown below.


Step 24 - Finally a Snake's Head
On the "Body" Layer's Layer Mask hide a portion of the tail's tip. Then open the Snake image, extract it and put it above the "Body" folder. Scale and rotate it, then place it near to the tail's tip.


Step 25 - Merging the Snake's Head with the tail
Add a Layer Mask and using several sizes of brushes hide some areas of the snake to merge them smoothly with the tail. Adjust the Hue/Saturation and Levels as shown below. Then Dodge and Burn some shadows and light if needed.


Step 26 - Final Touches
Since we'd painted a lot of dark shadows over a black background there must be some undesired dark spots here and there, you can delete them using a quick technique: Command-click over the "Body" layer or any other, then Command + I to invert the selection. Then Select the Eraser Tool and delete all the extra shadows that you may have. Do it as many times, and with as many layers, as necessary.


Conclusion
Every photo manipulation is a unique piece, hopefully this tutorial will inspire you to create your very own fantasy creature. Thanks for reading!