How to Create a Replacement iTunes 10 Icon
Posted by webiconset in the Icon Tutorials section.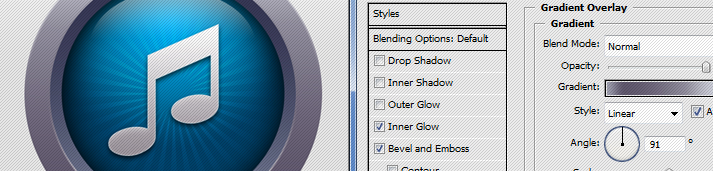
In this tutorial, we’re going to teach you how to create a replacement Itunes 10 icon that you will be able to use. I wasn’t really a fan of the original Itunes 10 icon that they came up with, so I set out to create my own. We will work through techniques using smart objects, filters, paths and more. If you want to improve your path tool skills and layer styles then this tutorial is for you.
Tutorial Details
Completion Time: 45mins
Skill: Intermediate
Step 1
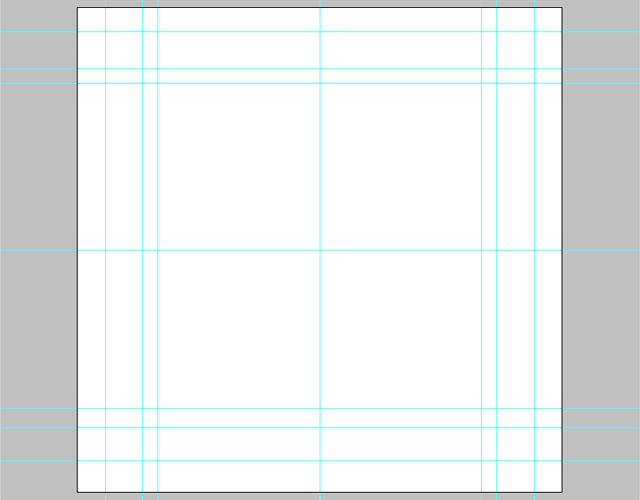
Open up Photoshop and create a new canvas with sizes: 600×600 pixels and 72 DPI. Once you have your new canvas open go to View and make sure Extras is enabled (Shortcut: CTRL+H) now go to View>Show>Smart Guides make sure it is enabled. Now go to View>New Guide – Create vertical guides at 34px | 80px | 99px | 300px | 501px | 519px | 566px and then create Horizontal guides at 29px | 75px | 93px | 300px | 496px | 520px | 561px these might seem to be a lot of guides, but they all do serve a purpose. This is what you should have now.
Step 2
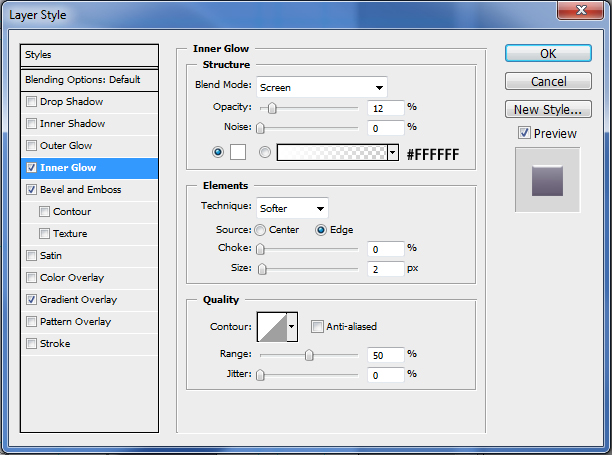
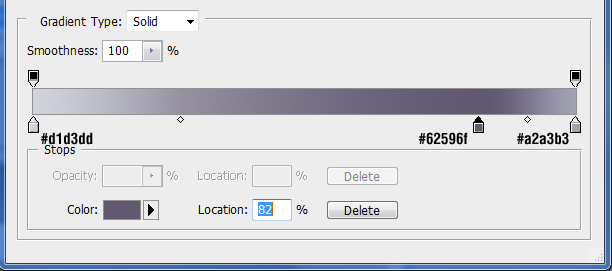
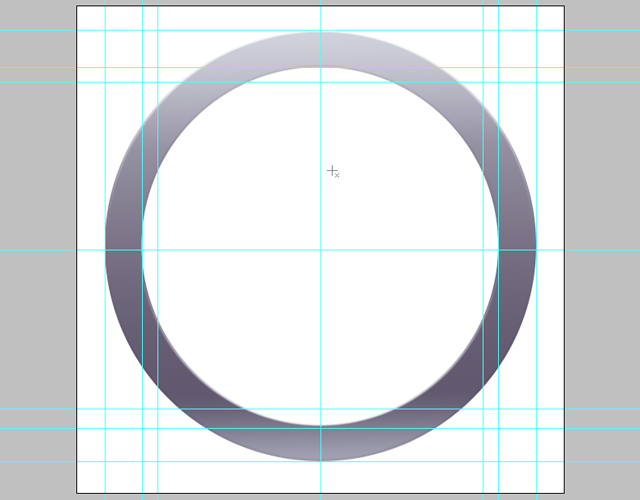
Now select your ellipse tool in the shape selection menu (Shortcut: Shift+U) now make sure your shape layers tab is selected at the top and not your paths tab, as well as your create new shape button and none of the other options. Using your outer guides, draw a circle using these guides as your diameter. Now with your shape created, right click on the shape layer and go to blending options, Select Inner Glow, Bevel and Emboss and Gradient Overlay. Now use the settings below to populate the different styles. Gradient Colors are #d1d3dd and #62596f and #a2a3b3


Now select the ellipse tool again from the menu and now make sure the Subtract from Path Area tab is selected (Shortcut: -) Now using the second guidelines draw a ellipse with the 2nd guidelines as the diameter and it will subtract the inner shape from the circle shape. This is what you should have.
Step 3
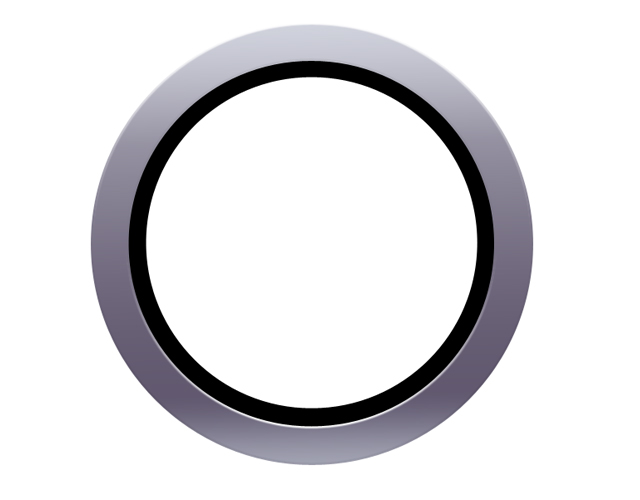
Now create another shape exactly like you created the previous one with the outer guidelines being the diameter and then use the subtract from shape to remove the middle piece of the shape using the inner guidelines as the diameter for the subtraction. Move the Newly created shape layer below the outer layer. This is what you should have.
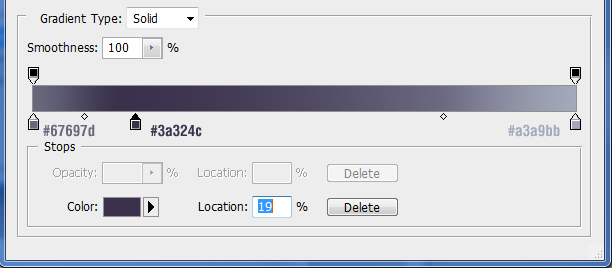
Now we are going to style the inner shape. Right click on the shape layer and select blending options. Now select Color Overlay #00a2ff and Gradient Overlay as your styles. The gradients hex color codes are #67697d and #3a324c and #a3a9bb check out the guides below.


Step 4
Now create a new layer by going to Layer>New>Layer and then moving the newly created layer below your two shape layers and then using the Elliptical Marquee tool to draw a circle underneath the two shape layer. Hold down Shift whilst drawing the selection to keep it constrained. Now using the Fill tool (Shortcut: G) fill the selectin with #000000 Black and then go to Select>Deselect. This is what you should have.
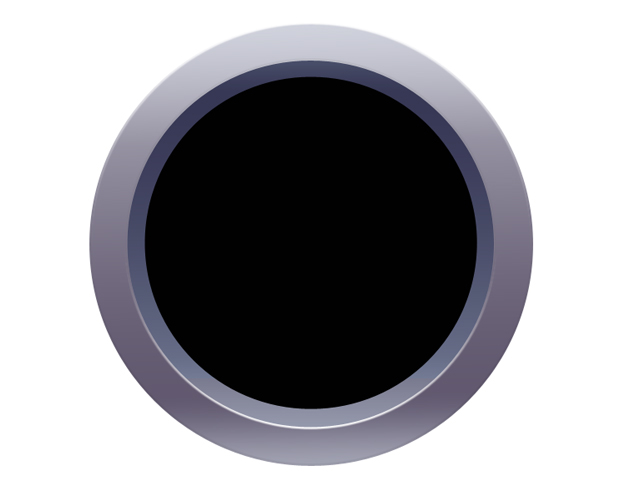
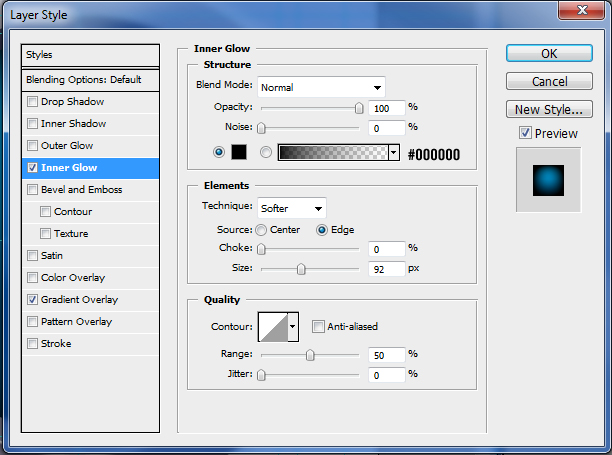
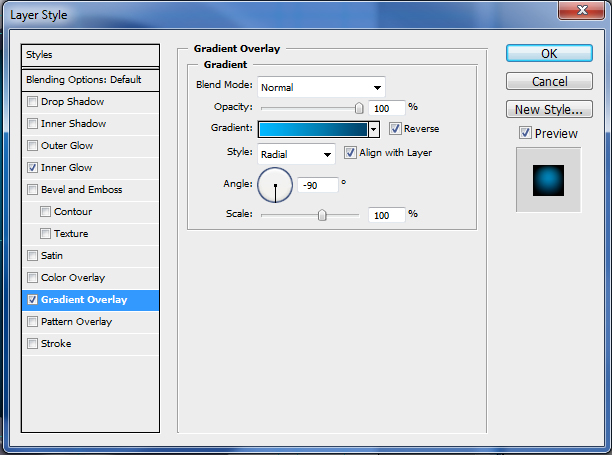
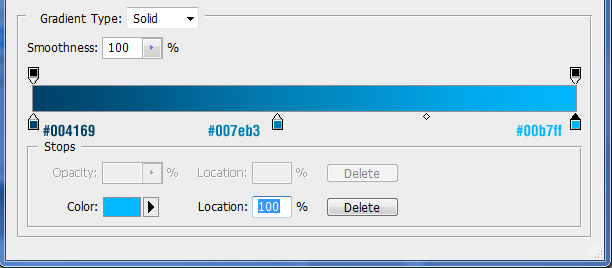
Now we are going to style the inner globe. Right click the layer and go to blending options. Select Inner Glow and Gradient Overlay . Use the settings below to populate the styles. Gradient Hex codes are #004169 and #007eb3 and #00b7ff

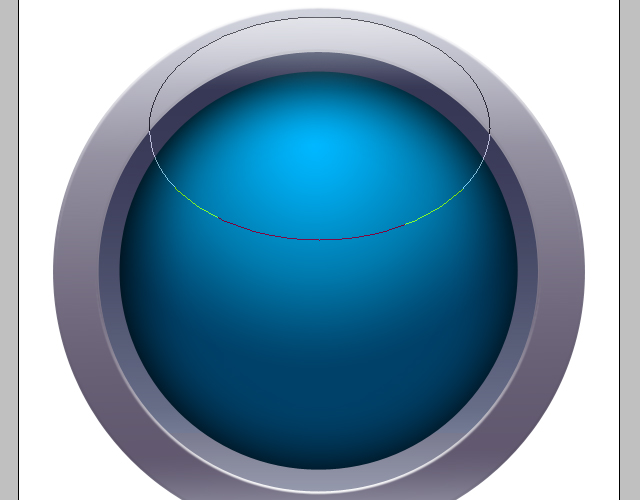
Step 5
Now select the ellipse shape tool again and make sure that you select the top layer in your layers palette. Now draw a ellipse on top of the outer shape which will act as a light reflection. Set the opacity of the layer to 50% and then go to Layer>Layer Mask>Reveal All and then use a soft black brush to remove the parts of the shape that you don’t want to act as a light source. You could use a black to white gradient as a tool as well. See the shape and outcome below.

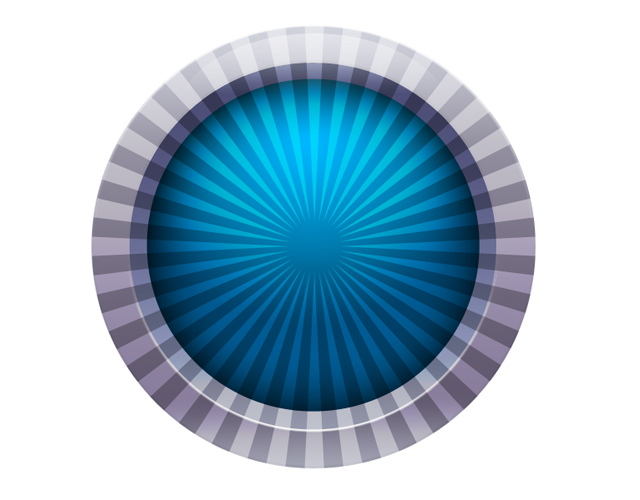
Step 6
Now go to your custom shapes palette (Shortcut: Shift+U) now select a shape that you would like to use for your background on your sphere in the middle. Now create your shape over your sphere in the middle and set the Blending Mode to Overlay and the Opacity to 41% now go to Layer>Layer Mask>Reveal All and then using a soft black brush erase the parts that overlap the outer bevel and shapes. See the examples below, the before layer mask and after.

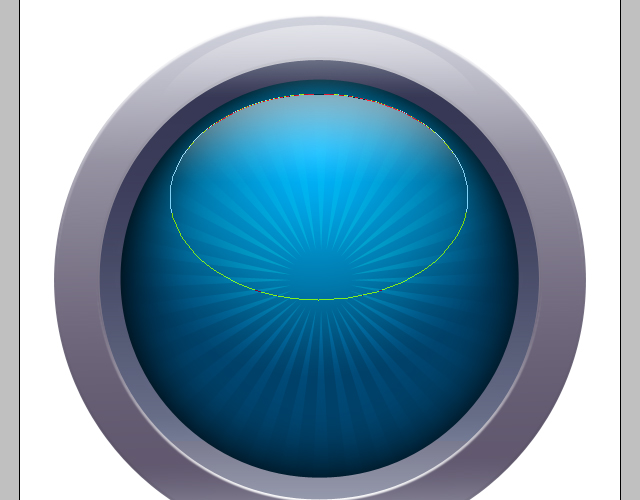
Step 7
Now we need to create another light reflection for the middle sphere. We do exactly what we did in Step 5. Create a ellipse on top of the middle sphere and then use a layer mask to remove the parts we don’t want. See the shape and outcome below.

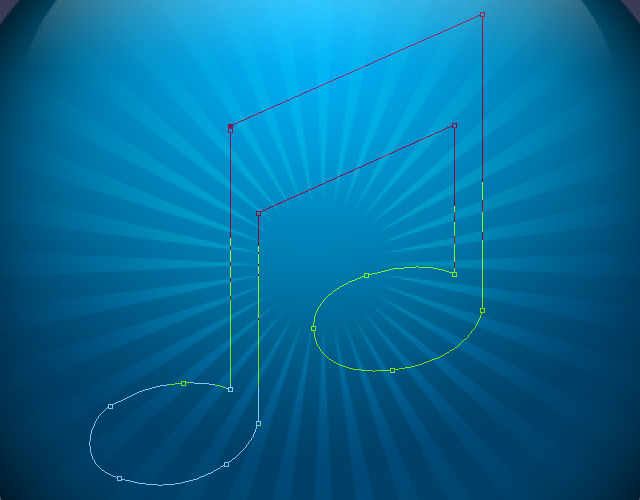
Step 8
Now here comes the interesting part. Create a new layer by going to Layer>New>Layer and then making sure its positioned above all your other layers. Now select your pen tool (Shortcut: P) and then make sure the paths tab is selected at the top. Now we are going to create our own music note. You can import a music note through shapes or brushes, or you can try creating your own. You can see the way my paths are situated in the screenshot below.
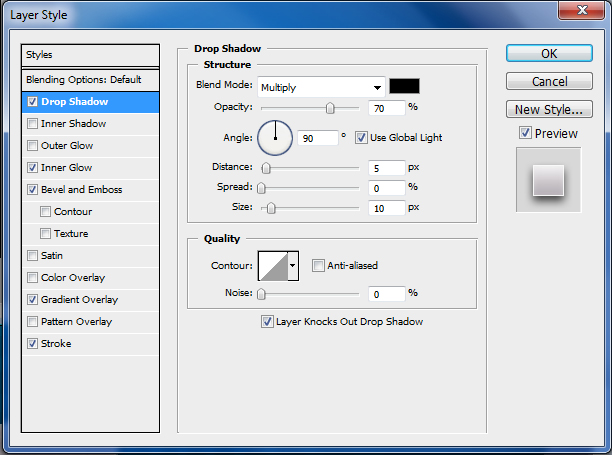
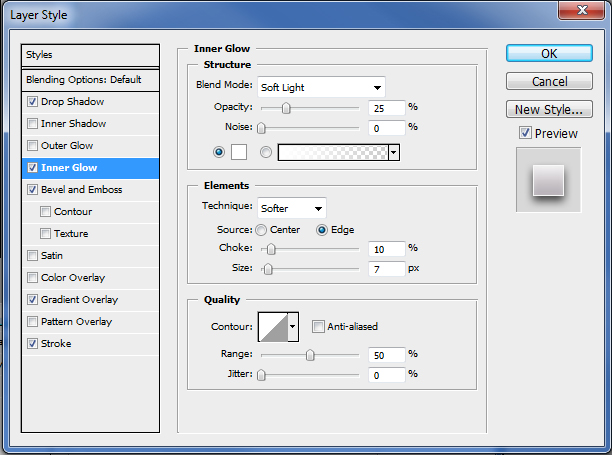
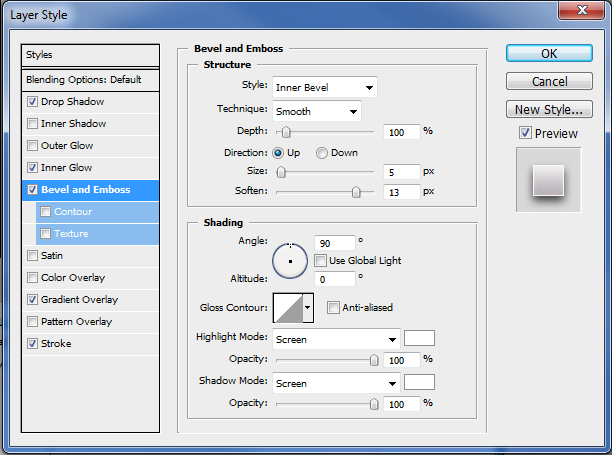
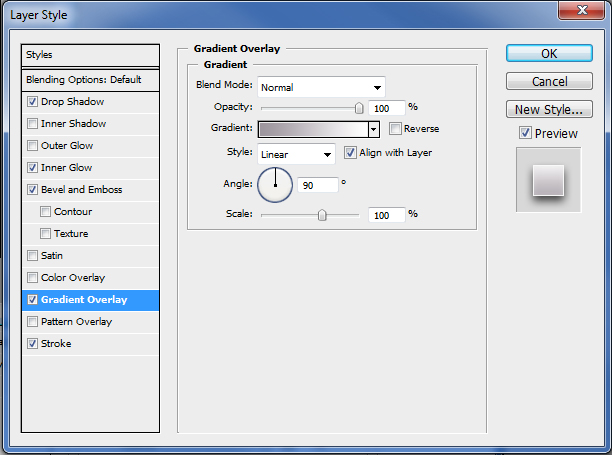
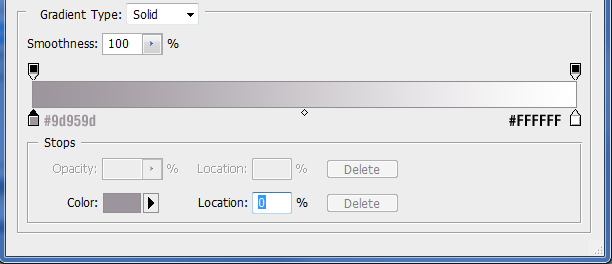
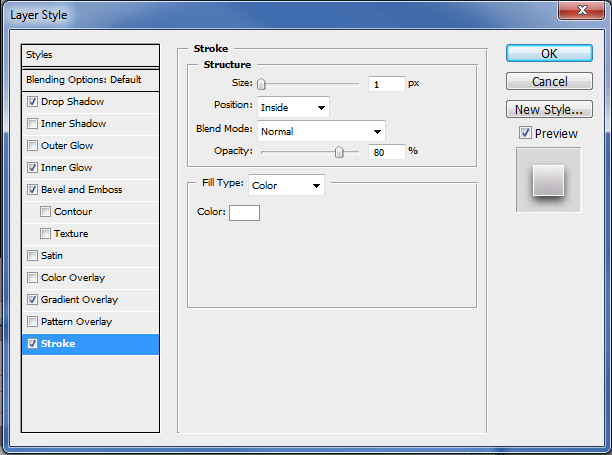
Now fill your path with black #000000 and then right click on the layer and then select Convert to Smart Object. Now a little box will appear in the layers preview panel. Now double click on that little box or right click and select Edit Contents. Now it will open a new window with the music note inside. Right click on the layer and select blending options. Select Drop Shadow, Inner Glow, Bevel and Emboss, Gradient Overlay and Stroke. Use the panels below to populate the styles. Gradient Color codes are #9d959d and #FFFFFF
Now go to File>Save and then you can close the music note canvas box. You will see it updated the music not in your icon canvas. Now with the music note layer selected, go to Filter>Noise>Add Noise and set the Amount to 1% and the Distribution to Gaussian and Monochromatic enabled and hit Ok.

Step 9
These are the final touches. Create a new layer and postition it below all our created layers. These are going to be the shadow layers. Now using your Elliptical Marquee tool create a large ellipse below the icon, fill it with #000000 black and set the opacity to 50%. see below.

Now with the created layer selected go to Filter>Blur>Gaussian Blur and set the Radius to 10.0 pixels and hit OK. Now go to Filter>Blur>Motion Blur and set the angle to 0 degrees and the Distance to 175 Pixels. You should have something like below.

Now create another new layer and using the elliptical marquee tool again create a smaller ellipse and fill it with black and set the opacity to 50%. Then go to Filter>Blur>Gaussian Blur and set the Radius to 7.0 Pixels. Now go to Filter>Blur>Motion Blur and set the angle to 0 and the distance to 100 pixels. See the procedure below.


We are done. That is how you create a replacement icon for Itunes 10.