


In this quick tip tutorial, we'll show you how to create a glass text effect using layer styles in Photoshop. Let's get started!
What You'll Learn in This Glass Effect Photoshop Tutorial:
- How to create a vignette effect background in Photoshop
- How to create a glass text effect in Photoshop
- How to use Layer Styles to create 3D text in Photoshop
If you're looking to have the glass text effect in Photoshop but save time on design, check out the premium downloads from Envato Elements! You can find premade glass textures for Photoshop and other programs that work in just a few clicks.


Follow this glass texture Photoshop tutorial with us over on our Envato Tuts+ YouTube Channel:
Glass Text Tutorial Assets
The following assets were used during the production of this Photoshop glass effect tutorial:
- Font - The Nautigal
- Pattern used for the background (GraphicRiver)
- Background Image (Free)
Are you ready to start making glass text effects in Photoshop? Then let's get started!
1. How to Create a Gradient Background
Step 1
First, create a new PSD document, 600 x 400 pixels in RGB mode, 72 DPI with a white background color. Now prepare your assets. Install The Nautigal font on your computer and optionally open the PAT file to create a background. Or you can use the Background Image instead of starting a new document, so you can skip creating the background and jump to step 3 of this glass text effects tutorial.


Step 2
To make the glass text background, go to Layer > Layer Style > Blending Options and use the settings below.
You can also access the Blending Options in two faster ways. The first (and the fastest) way is to double-click on the layer in your Layers panel. The other way is to right-click on the layer in your Layers panel and choose Blending Options.
When you're done with all the settings below, don't forget to hit OK in the Blending Options window! If you've downloaded the Patterns file, use pattern number 31. You can also leave the glass effect PSD background without the pattern overlay or use any other pattern as the result will look great on any light background.


2. How to Create Glass Text Effects in Photoshop
Step 1
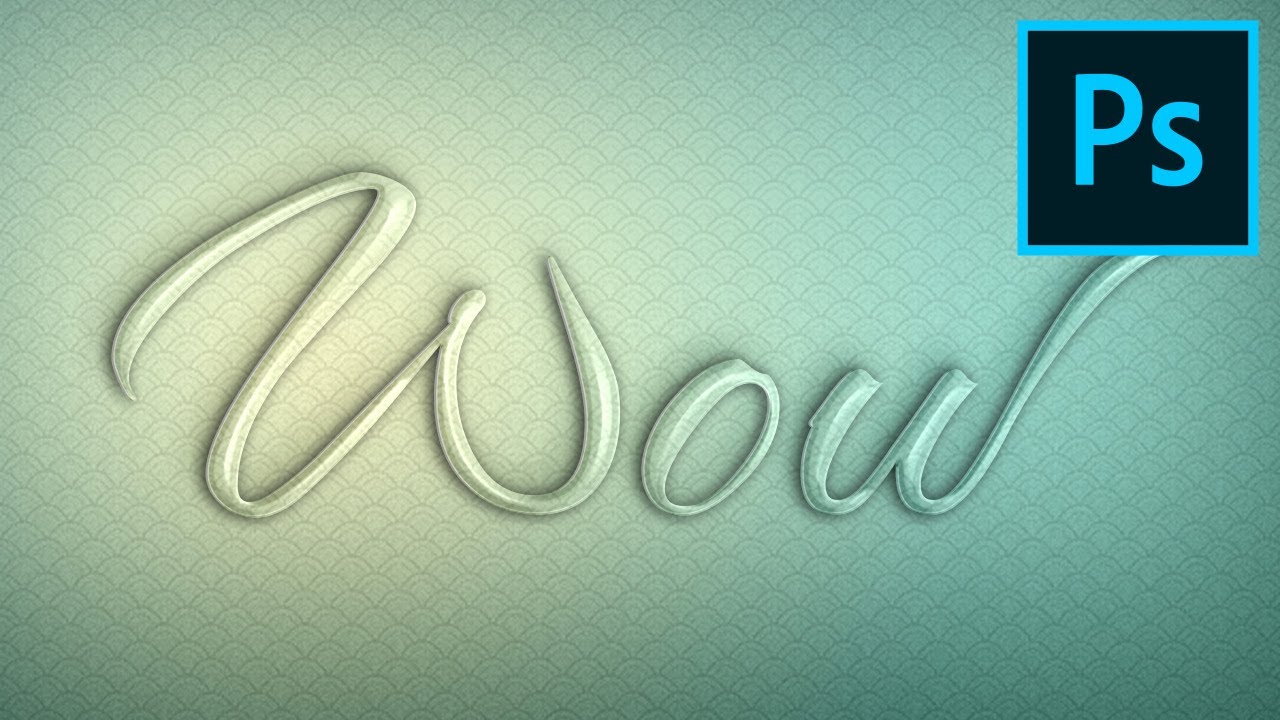
Start by creating the first text layer. Now we can start making our text effect. First, choose the Type Tool and change the Font to The Nautigal, Size around 255 pt and Anti-Aliasing Sharp. Now type your text somewhere in the center of the image. You can write any word, but in this glass effect Photoshop tutorial I'll use "Wow".


Step 2
This first text layer will be at the bottom of all the text layers. Go to Layer > Layer Style > Blending Options and use the settings below on your text.


Step 3
Now let's create and customize the second glass Photoshop text layer.
Duplicate your text layer, and select the new text layer. Select the text layer in the Layers panel and go to Layer > Duplicate layer and name it as you wish. Now go to Layer > Layer Style > Clear Layer Style as we'll make a different style for this layer. Finally, go to Layer > Layer Style > Blending Options and use the settings below on your text.
You can also use the quicker methods to access the Blending Options from "Step 2" of this tutorial. When you're done with all the settings below, don't forget to hit OK in the Blending Options window! This glass Photoshop text layer will be in the middle of all three text layers in your Layers panel. So for now it should be above the first one.


Step 4
We're almost there. Now it's time to create and customize our third and last glass text PSD layer.
Start by duplicating the second text layer. Select the text layer in the Layers panel and go to Layer > Duplicate layer and name it as you wish. Now go to Layer > Layer Style > Clear Layer Style as we'll make a different style for this layer. Finally, go to Layer > Layer Style > Blending Options and use the settings below on our text.
Again, you can use the quicker methods to access the Blending Options from "Step 2" of this glass text effect Photoshop tutorial. When you're done with all the settings below, don't forget to hit OK in the Blending Options window! This text layer will make most of the effects and must be on top of all other text layers.


Photoshop Glass Effect Styles From Envato Elements
If you need a glass text effect for your Photoshop project, you can also try one of these downloads:
Holographic Glass Text Effect (PSD)
Here's a glitzy Photoshop glass effect that's definitely eye-catching. The glass style is topped off by a holographic touch that completes the look. Use the glass effect PSD file for logos, product promos, and more.


Glass Photoshop Action (ATN)
Go 3D with this glass texture Photoshop action. You'll get 13 premade colors to choose from for your work. The organized folders make choosing what you want to experiment with an uncomplicated task. This glass effect Photoshop action also has unique features like a global light function.
Outline Gradient Photoshop Glass Text Effect (PSD)
Get a nice gradient in your glass text with this download. Each letter of your words will be outlined by an editable gradient effect. Try adding your brand colors or go for something completely fresh! If you need assistance with the glass effect PSD file, just check out the included help document.


Ultra Realistic Reflective Text Effect II (PSD)
Get some rock star attitude with this glass text PSD. Customizing the glassy chrome effect is simple thanks to the organized layers. There's also Smart Object replacement to make things easier. It's definitely a glass effect PSD file worth considering for band posters and more.


Pink Glass 3D Text Effect (PSD)
Pretty in pink has never looked prettier. This glass effect for Photoshop takes a colored approach that doesn't disappoint. The high-resolution document works with any text you throw at it. With results that look this good, you'll want to add pink text everywhere with this glass text effect PSD file.


That's All!
If you enjoyed this glass texture Photoshop tutorial, check out these resources as well:

 How to Create an Elegant, Ornate 3D Photoshop Text Effect


 How to Create a Flame Text Effect in Adobe Photoshop


 Quick Tip: How to Create a Metallic Text Effect Using Layer Styles in Photoshop

 How to Create a Medieval Metallic Text Effect in Adobe Photoshop


 How to Make a 3D Text Effect in Photoshop


