

Make skin look perfect in one-click with these AI-powered Photoshop actions.
Learn how to create a LOMO camera icon with this detailed Photoshop tutorial. This tutorial covers many drawing techniques such as creating a leather texture, adding reflection to glass, shading, and more.
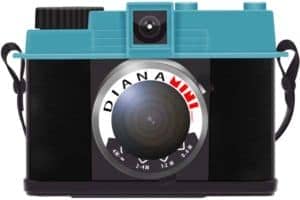
Preview of Final Results

Create a Diana Mini LOMO Camera Icon Photoshop Tutorial
Step 1 - Create a new document file.
Create new document with dimension 3456x2304 pixels.

Step 2 - Make a shape
Make new path with Pent Tool (P) like me . .

Right-click and select Make Selection and set father 0,5

Press Shift+F5 or go to Edit - Fill and select from menu Color and put #459caf color .

Step 3 – Make button reflexion
Make new path with Pen Tool (P) like in the picture below .

Right-click and select Make selection and set father 0,5 .

Press Shift+F5 or go to Edit - Fill and select White from menu .

Set layer opacity to 30% .

Step 4
Go to Filter – Blur – Gaussian Blur and set Radius to 1 px .

Step 5
Make new path with Pen tool (P) like in the picture .

Right-click and select Make selection and set father 0,5 .

Step 6
Select Gradient Tool (G) from menu and use this setting :
0% - black
50% - white
100% - black

Step 7
Select Gradient Tool (G) and apply the gradient like the arrow .

Set layer opacity to 44% and Blending Option to Soft Light .

Step 8
Make new path with Pen tool (P) like in the picture .

Right-click and select Make selection and set father 0,5 .

Step 9
Select Gradient Tool (G) and apply the gradient like the arrow .

Set layer opacity to 44% and Blending Option to Soft Light .

Step 10
Make new path with Pen Tool (P) like me .

Select brush tool and set size to 18px and hardness 0% . Right-click and select stroke path and select from menu brush .

Set layer Blending Mode to Soft Light .

Step 11
Make new path with Pen Tool (P) like me .

Select brush tool and set size to 18px and hardness 0% . Right-click and select stroke path and select from menu brush .

Set layer Blending Mode to Soft Light .

Step 12
Make new path with Pen tool (P) like in the photo .

Right-click and select Make Selection and set father 0,5 . Press Shift+F5 or go to Edit – Fill and select from menu White .

Step 13
Eraser this zone with erase tool and brush size 80px .

Set layer to Sift Light and Opacity 50% .

Step 14
Make new path like in the photo with Pen tool .

Right-click and select make selection with father 0,5 . Go to Filter – Blur – Gaussian Blur and set Radius to 4 .